In this series, I’ll talk about how I painted and built a bike earlier this year. This post will explain how I found the bike frame and prepped it for painting.
Motivation
I decided to build a bike in late August of this year because I wanted a long-term project and figured that I could use an upgrade in the bike department. My bike at the time was an old no-name French road bike, likely made some time in the 60’s. The bike worked and was in decent shape, but it was far from perfect. Unreliable friction shifting combined with components that were low-end 50 years ago meant that the chain would slip if you tried to pedal too hard. Shifting into the highest gear would straight up knock the chain off, which led to more than a couple roadside repairs. Apart from actual ride quality, lugging 30 pounds of French steel up three flights of stairs every day was not something that I looked forward to.
In addition to all these factors, I felt that the bike wasn’t optimal for the way I was riding it. I live in Boston and use biking as a commuting tool. My commute is about 10 minutes each way through heavy automotive traffic / on a college campus. This makes for a lot of rapid accelerations, tight turns, and waiting at stop lights. On the old bike, this translated to riding the brakes for basically my entire commute. Also, because the terrain is so flat, I very rarely felt the need to shift, especially considering how unreliable shifting on the bike was.
Project Goals
With a good understanding of what I needed out of a bike, I wrote out some project guidelines for myself. The primary goal of the project was to “Build a unique, quality fixie that will last a long time.” The fixie part was important - I figured that being able to start and stop the bike entirely with my feet would give me the control I needed to navigate the city at both low and high speeds. I had never ridden a fixie before, so I guess it was kind of risky to assume that I would like it, but I think that it turned out to be a great decision. Along with this primary goal, the project had a couple other guidelines that I set for myself:
- Do all of the work yourself. This meant hand-painting and assembling. I wanted to have something that was truly a product of my own work.
- Minimize waste. I didn’t want to buy a perfectly good bike only to throw away all the existing components. That felt wrong to me. Similarly, I didn’t want to get a bike with flawless paint only to completely repaint it.
- Don’t be flashy. This was a largely stylistic decision, but it has the added bonus of making it less likely that the bike will get noticed by thieves.
- Prioritize reliability. Everything’s a tradeoff. In the case of bikes, there are tradeoffs between reliability, cost, weight, and complexity. Given that I was building a fixie, complexity wasn’t a big worry for me. However, I was still interested in keeping cost and weight down. I just wanted to make sure that both of those things came second to reliability (within reason).
- Borrow as many tools as possible. I’m not a bike mechanic. When I started this project, I didn’t own any tools in Boston, and I wanted to avoid spending hundreds on special wrenches and gadgets. I ended up cheating on this guideline quite a bit - sometimes out of necessity, sometimes out of convenience.
- Steel frame only. I could come up with some practical reasons for this guideline, but they’d all be lies. I just love the way lugged steel looks.
Finding a Frame
I started this process by learning about the characteristics of a good frame. Sheldon Brown’s website is an invaluable resource for anything bike-knowledge related. I think it’s up there with Stack Overflow and Wikipedia as one of the best public sources of information on the internet, and I applaud the work of Sheldon (rest in peace) and the other site contributors. Google also led me to a lot of posts on various bike forums, which were very good as well. Through this research, I concluded that the three main components of frame quality are geometry, build quality / condition, and materials. If I could go back, I’d add hardware / features to this list, but not taking this into consideration ended up being a non-issue for me.
In terms of geometry, I knew that I was looking for some variant of a road frame in my size, but I didn’t think it mattered much beyond that for my purposes and ability level. For build quality, I was hoping to buy a frame and make that had a good reputation and wasn’t dented, rusted out, etc. It’s pretty hard to visually judge build quality of a bike frame, especially when buying on the internet, so I relied heavily on reputation here. Because I knew that I wanted a lugged steel frame, it pretty much came down to the type of tubing used on the bike.
With these things in mind, I started to search for a frame on ebay. I found a lot of quality frames there, but they were all really expensive, and often in such good cosmetic shape that I felt uncomfortable repainting them. I also started looking on craigslist, which had plenty of suitably crappy bikes. However, almost all of these bikes were in working shape, which was a no-go for me.
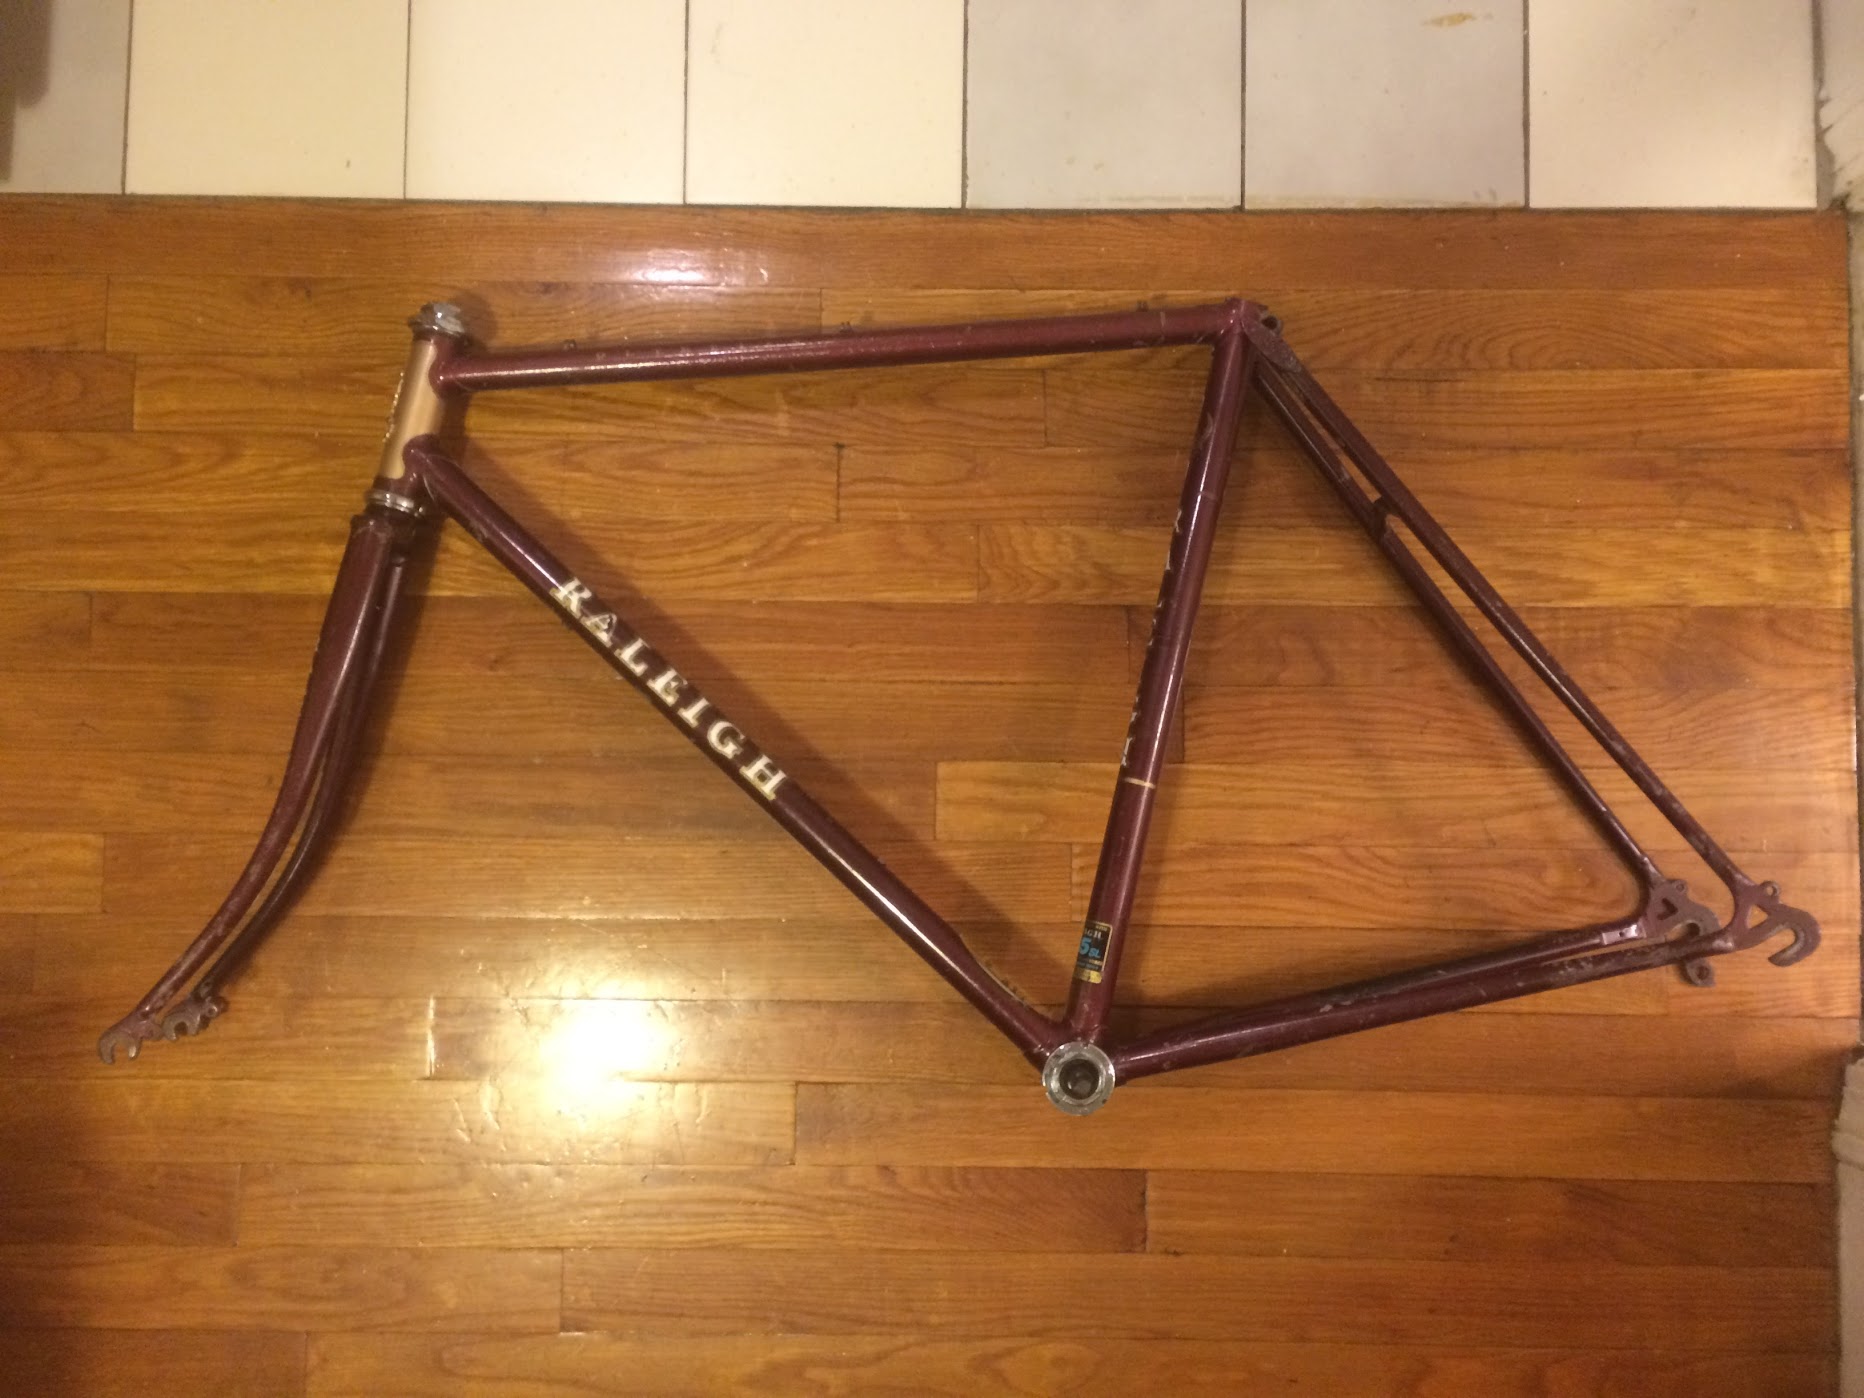
Many hours and pages deep into craigslist, I got lucky. I found a 1985 Raleigh Olympian frame with bars and stem for only $35. There appeared to be no structural damage, some cosmetic scarring, and no included components. The seller even had a ton of high-quality pictures of the frame. Perfect! Internet reviews revealed that people thought pretty highly of the frame, which was one of the higher tier models at the time of its release. The Olympian has a “Performance Touring” geometry, which I was fine with. Ideally, I would’ve gotten something a little snappier for tight turns + quick acceleration and whatnot, but trading those things for ride quality is far from the worst thing I could’ve done. Plus, the Olympian has plenty of room and mounting points for fenders, which are a necessity for riding through Boston winters. Finally, the tubing seemed to be good enough. The 1985 Olympian has Raleigh proprietary tubing that apparently is comparable to Reynolds 531, which was good enough for me. Because I was prioritizing reliability over weight, a little extra tube thickness could even be seen as a good thing. Needless to say, I bought the frame.
Prepping for Paint
With frame in hand, I set about getting the bike ready for painting. First, I took the bike apart - removing the fork and bottom bracket. I also clipped and filed off the cable guides on the top tube and bottom bracket shell.
When it came time to strip the paint off, I started by taking some 100 grit sandpaper and going at it. I realized that this was a dumb idea after about 20 minutes. It takes forever, creates a bunch of dust, and has the potential to damage the metal. So, instead, I bought some chemical paint stripper and used that. It went a lot faster, but still took a couple hours spread out over two or so weeks. The paint falls off easily after the stripper is appplied, but still requires some scraping with a metal implement. This scraping took the bulk of the time.
Though the paint stripper got the bulk of the paint off, I still needed to spend a couple hours with 320 grit sand paper, clearing off leftover paint and surface rust. I originally bought some of this rust remover to deal with the surface rust, but in the end it too much of a pain to apply. There might be different types of rust remover that are easier to slather on a bike, but sanding seems to do the job really nicely as far as surface stuff is concerned.
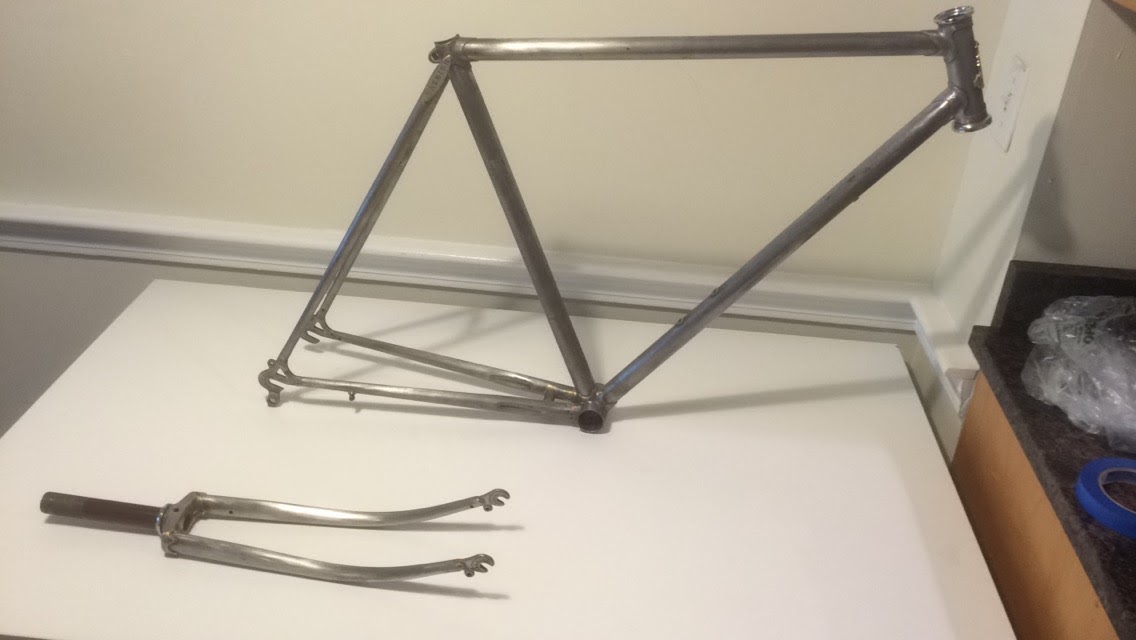
For me, the whole process probably took about 10-20 hours of work spread out across two weeks. The process probably could’ve been greatly expedited with better (power) tools, as sanding and scraping took a ton of time. If I could do this again and didn’t have such a strict requirement to do everything by hand, I probably would’ve just paid someone to beadblast the frame. Hell, I would’ve paid someone to paint it too - the whole process was a ton of work. Regardless, it was all worth it in the end. My shiny, stripped frame was ready to be painted! You can read about the next steps in the painting process here.